Consider two important rules for using virtual instruments when performing live. Firstly, your entire system could suffer catastrophic failure at any moment.
Alternatively, your system will probably, in all likelihood, give you years of reliable operation. So consider this is a “hope for the best, but plan for the worst” situation and this article is about how to plan for the worst.

Mac vs Windows
For desktop computing, I use both; on laptops, for almost a decade I used only Macs, but now I use only Windows. Computers aren’t a religion to me and for live performance, they’re simply appliances. I’d switch back to Mac tomorrow if I thought it would serve my needs better, but here’s why I use Windows for playing softsynths live.
1. Less expensive hardware. If the laptop dies, I’ll cope better.
2. Often easier to fix. With my current Windows laptop, replacing the system hard drive takes about 90 seconds. Laptop drives are smaller and more fragile, so this matters.
3. Easier to replace. Although it’s getting much easier to find Macs, if it’s two hours before the gig in East Blurfle and an errant bear ate my laptop, I’ll have an easier time finding a Windows machine.
4. Higher performance when running at low latencies. Don’t take my word for it: Go to dawbench.com before you start writing hate mail.
5. Optimisation options. This is a double-edged sword because if you buy a laptop from your local big box office supply store, it will likely be anti-optimised for live performance with software instruments. We’ll cover tweaks that address this, but you’ll have to enter geek mode. If you just want a Windows machine that works, then...

6. Consider a pre-optimised audio laptop. I’ve used laptops from PC Audio Labs, Rain, and ADK, and they’ve all outperformed off-the-shelf laptops. My current music laptop is a PC Audio Labs x64 machine that was optimised for video editing, but the same qualities that make it rock for video make it rock and roll for music. Of course, if “you’re a Mac” (perhaps because MainStage or Logic is your act’s centrepiece), be my guest, even a MacBook Air has enough power to do the job. But if you’re starting with a blank slate, or want to dedicate a computer to live performance, Windows is currently a pretty compelling choice.
Preparing for disaster
There are two main ways disaster can strike:
1. The computer can fail entirely. One solution, while pricey, is a redundant, duplicate system. Consider this an insurance policy, it will seem inexpensive if your main machine dies. Another solution is to use a synth or workstation with internal sounds as your master MIDI controller, think Yamaha Motif or MO series, Korg Triton or Kronos, or Kurzweil PC series. If your computer blows up, at least you’ll have enough sounds to get through the gig. If you must use a controller-only keyboard, then carry an external sound module you can use in emergencies.
If you have enough warning, you can buy a new computer before the gig. In that case, though, you’ll need to carry everything needed to re-install the software you use. One reason I use Ableton Live for live performance and hosting soft synths is that the demo version is fully functional except for the ability to save, it won’t time out or emit periodic noise bursts in the middle of a set. I carry a DVD-ROM and USB memory stick (redundancy!) with everything needed to load into Live to do my performance. So if all else fails, I can buy a new computer, install Live, and be ready to go after making the tweaks we’ll cover shortly.

2. Software can become corrupted. If you use a Mac, bring along a Time Machine hard drive. With Windows, enable system restore— the performance hit is very minor. Returning to a previous confi guration that’s known to be stable may be all you need to fix a system problem. For extra security, carry a portable hard drive with a disk image of your system drive. Macs make it easy to boot from an external drive, as do Windows machines if you’re not afraid to go into the BIOS and change the boot order.
Windows 7 and Vista Tweaks
Neither Windows nor Mac OS are realtime operating systems. Music is a realtime activity. Do you sense trouble ahead?
A computer juggles multiple tasks simultaneously, so it gets around to musical tasks when it can. Although computers are pretty good at juggling, occasional heavy CPU loading (spikes) can cause audio dropouts. Although one option is increasing latency, this produces a much less satisfying feel. A better option is to seek out and destroy the source of the spikes.
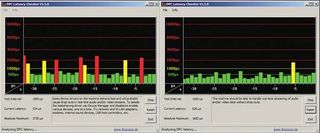
Your ally in this quest is DPC Latency Checker, a freely downloadable utility. [Download the free utilities DPC Latency Checker.] LatencyMon is another useful program, but a little more advanced. [Download LatencyMon to optimize your system.] DPC Latency Checker monitors your system and shows when spikes occur (see Figure 1); you can then turn various processes on and off to see what’s causing the problems.
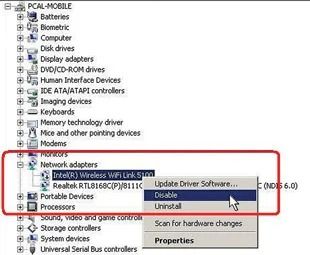
From the Start menu, choose Control Panel, then open Device Manager. Disable (don’t uninstall) any hardware devices you’re not using, starting with any internal WiFi card, it’s a major spike culprit. Even if your laptop has a physical switch to turn this on and off, that’s not the same as actually disabling it (see Figure 2). Also disable any other hardware you’re not using: onboard webcam, Ethernet port, internal audio (which you should do anyway), fingerprint sensor, and the like.

By now you should see a lot less spiking. Next, right-click on the Taskbar and open Task Manager. You’ll see a variety of running tasks, many of which may be unnecessary. Click on a process, then click on End Process to see if it makes a difference. If you stop something that interferes with the computer’s operation, no worries you can always restart.
Finally, click on Start. Type “MSConfig” into the Search box, then click on the Startup tab. Uncheck any unneeded programs that load automatically on startup. If all of this seems too daunting, don’t worry; simply disabling the onboard wireless in Device Manager will often solve most spiking issues.
Power use for power users
Laptops try hard to maximize battery life. For example if you’re just composing an email, the CPU can loaf along at a reduced speed, thus saving power. But for realtime performance situations, you want as much CPU power as possible.
Always use an AC adapter, as relying on the battery alone will almost invariably shift into a lower-power mode. With Windows machines, the most important adjustment is to create a power plan with maximum CPU power.
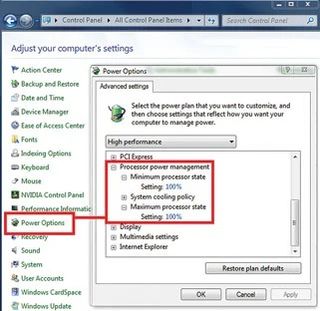
With Windows Vista or 7 (Windows XP’s power management is pretty inflexible), go to Control Panel > Power Options and create a new power plan. Choose the highest-performance existing power plan as a starting point. After creating the plan, click on Change Plan Settings, then click on Change Advanced Power Settings. Open up Processor Power Management, and set the Maximum and Minimum processor states to 100% (see Figure 3). If there’s a system cooling policy, set it to Active to discourage overheating.
If overheating becomes an issue (it shouldn’t), you can probably throttle back a bit on the CPU power, like to 80%. Just make sure the minimum and maximum states are the same; I’ve experienced audio clicks when the CPU switched states. (In the immortal words of Herman Cain, “I don’t have the facts to back me up” but it seems this is more problematic with FireWire interfaces than USB.)
The happy laptop
A laptop’s connectors are not built to rock ’n’ roll specs. If damaged, the result may be an expensive motherboard replacement.
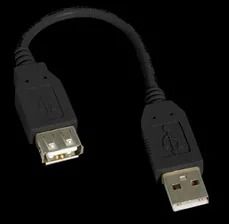
Ideally, every computer connection should be a break-away connection; Macs with MagSafe power connectors are outstanding in this respect. With standard power connectors, use an extension cable that plugs between the power supply plug and your computer’s jack. Secure this extension cable (duct tape, zip ties, wrap it around a stand leg, whatever) so that if there’s a tug on the power supply, it will pull the power supply plug out of the extension cable jack, not the extension cable plug out of the computer. With USB memory sticks or software license dongles, use a USB extender (see Figure 4).
It’s also important to invest in a serious laptop travel bag. I prefer hard-shell cases, which usually means getting one from a photo store and configuring the internal foam for a computer instead of cameras.
Finally, remember when going through airport scanners to put your laptop last on the conveyer belt, after other personal effects. People on the incoming side of security can’t run off with your laptop, but those who’ve gone through the scanner can if they get to your laptop before you do.
The laptop alternative
If laptops make you nervous, there’s an alternative: the Muse Receptor line and its offspring, the MuseBox (shown). These machines stuff what’s essentially a computer into a sturdy, road-worthy box, and run virtual instruments and processors. It can connect to a laptop, which serves more like a “terminal” for accessing the Receptor’s innards, but you can also treat it as a plug-and-play sound machine. Get two, and now you have redundancy, the Holy Grail of live performance.


